Taking (mostly) great photos without a 'proper' camera
May 9
5 min read
A quick snap of my very basic setup for photos
One of the biggest challenges of taking photos of miniatures is that at such small sizes, it is almost impossible to take a good photo with the whole miniature in focus at once. To get around this, I use a technique called focus stacking with my phone camera and then merge all the images together in software in a way that creates an image where everything is clear.
For the photos, you'll need:
Camera phone with Open Camera Installed
Plenty of free storage space (these files will be pretty large)
A tripod or something to keep the phone stable
Some kind of backdrop
Your model
Good lighting
For the post-processing, you'll need
A way of transferring files from your phone to the computer
The first part: Setting up and understanding OpenCamera
The first thing you'll want to do is make sure you have Open Camera downloaded and plenty of free storage space on your phone. We will be using this app to access more features of our camera than the standard photo app provides.
To access focus stacking, which is the mode we will need to take our source photos in, you'll need to open up the expanded features of the app first. To do this, follow the steps below:
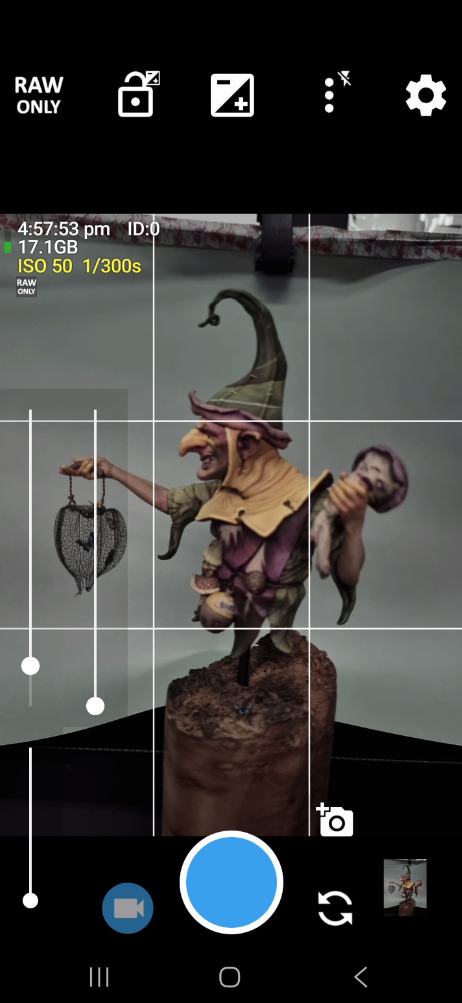
When you open Open Camera, it will likely look something (but not quite) like this. I have already changed some of my preferred settings here. One of the main setting I change is to take photos in RAW only, using the option in the top left. This largely just saves me space, but you want to make sure that you are capturing raw images as it opens up the editing options for us later.
Don't worry if setting it to RAW makes the image appear quite dull. We want the data, not the picture to look good on the phone screen itself.
Click on the cogwheel in the top right to open up your options, then scroll down to Camera API.
Select Camera2 API.
If this does not automatically restart the app for you, manually close it and reopen it. If you don't, you won't be able to follow any of the next steps.
you should now have access to a whole host of new features. Click on the three dots to open up the photo mode options and select FOCUS {}Set the resolution and number of photos to your desired output. I find that twenty steps is more than enough.
Your screen should now look something like this. A few key features to make note of. - The leftmost slider is where your focus will stop. Adjust this on your phone screen so that the very back of the model is slightly out of focus.
- The right slider is where your focus will start. Move this down to the very bottom, and then raise it until the very front of your model is just coming into focus.
Important to note that you will need to do this every time you move the camera or the model.
Now take your picture. There are a few options here. I use Windows Phonelink to access my screen remotely, so that I have no chance of bumping the phone as I hit the camera button. You can also use the timer. I use a 10sec timer for when I'm not remotely accessing my screen. The important part here is to make sure your phone is completely steady during the process, as even the slightest shake can mess up one of your photos.
Once you begin the process, it will automatically take a number of photos with a focal distance divided equally between the two set points.
Once that's done, you should have twenty (or whatever number you chose, I'll use twenty from hereon) photos of the same thing, each with a slightly different part of the model in focus. We're now done with the phone and camera end of things.
The second part: Stacking the images.
Once you transfer the images to your computer, you should have twenty .dng files for each set of photos you took. Open Camera helpfully numbers them in an easy way, between 0and 19 at the very end of the filename.
It may be easier to separate out these per set into different folders before you begin.
In Affinity, navigate through the following menu items.
File > New Image Process > Focus Merge
In the New Focus Merge popup window, click Add and then select one stack of photos. In this case, it is the series from IMG_20260509_143050_0.dng to IMG_20260509_143050_19.dng, for the full 20 image stack. Once that is done, hit OK
Affinity will then perform the stacking and blending process for you in three parts. This is quite an intensive process, so don't be surprised if it takes a while. What is happening behind the scenes is as follows:- Importing in the entire stack of images in order of their numbering
- Using image and edge recognition to line them all up over each other, fixing the slight distortion that comes from the changing focal length.
- Identifying which layer best shows different parts of the model in focus, and then merging only that part into the final image.
Once it is all done, you should be left with an image that is clear and in focus over all parts of your model.
The third part: Developing the images.
Now that you have a focus-stacked image sitting there, ready to go, you'll likely notice that it just doesn't seem as bright as necessary or the white balance might be completely out. To fix this (and a few other issues caused by the limits of your phone camera), we now get to Develop and tweak the photo.
Most important at this stage is to make sure you are in the Pixel editing mode for Affinity in the top left.
In the top menu, open up
Pixel > Filters > Develop
This will bring up a new screen with options for tweaking the raw, composited photo that we now have and clearing up imperfections or issues that might be present. I've just included a few of my standard tweaks below.
Use any of these filters and effects in moderation, and always tweak by eye while having the model in front of you for reference.
Exposure affects how sensitive your camera is to light, resulting in an image that might be too dark, balanced, or too light.
Noise Reduction is often important in pictures I take with my phone, as it is an older model that tends to create a staticky effect when zoomed in.
By default I use a light pass of the Luminance noise reduction mode. It reduces the static effect without artificially smoothing my actual paint work.
Before:
After:
White Balance is crucial for your colours to show up accurately. On the left hand side of the screen, click on the tool here and select any part of your photo that should be a white object in real life.
Otherwise you can tweak this by eye using the sliders on the right
You can also save presets, for when you have a series of images all taken under the same conditions. This saves you time and ensures consistency.
Click on the V in the top right of the develop options to save your current settings. You can then duplicate those same settings over multiple files by selecting the preset.
Once done, hit Develop and then crop, clean up and save your picture in your favourite format.
Hope this helps some of you.
- Nat
Comments
Couldn’t Load Comments
It looks like there was a technical problem. Try reconnecting or refreshing the page.


Comments